Yesterday my friend Bill gave me a very cool gift; a Brownie Junior Six-20! The camera is in terrific condition and I can’t wait to get some film and start playing. Maybe I can take some shots worthy of Light Leaks magazine.
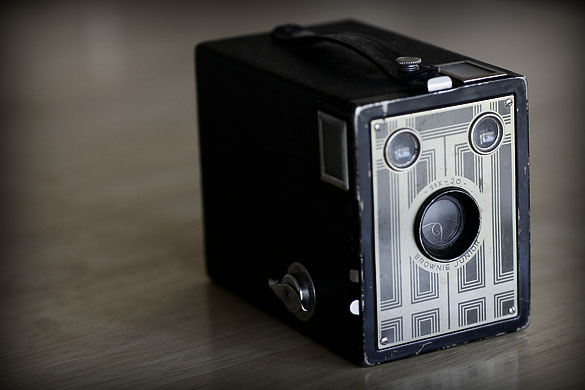
My “new” Brownie Junior.
Yesterday my friend Bill gave me a very cool gift; a Brownie Junior Six-20! The camera is in terrific condition and I can’t wait to get some film and start playing. Maybe I can take some shots worthy of Light Leaks magazine.
My “new” Brownie Junior.
Amy, one of my former students, dropped by the studio yesterday to catch up. Amy took my 8 week Digital Photography 101 course last November. She was recently hired to hop on a helicopter and shoot stills of Lake Powell. One of the photos from that shoot was picked up by the New York Times and published this week. Way to go Amy!
Click here to see the photo and read the article in the New York Times.
I discovered an amazing resource for photographers today. Jeff Curto from College of DuPage is making his class lectures available via a podcast. Here’s more info from his site.
The Podcast
This podcast is recorded during class lectures for History of Photography, Photo 1105 at College of DuPage. The podcasts are intended as review for students in the class, but thousands of people around the world have found them useful to their education as photographers. Please be aware that there are many links to relevant class information on the class’ main web page, as well as a course syllabus – use the links to the right to find that information.
Listening, Watching & Subscribing
You can listen to and watch the podcasts from these pages or you can subscribe to them using a podcast reader. The most popular podcast reader is Apple’s iTunes. If you subscribe using this link, each time there is a new class session posted on the internet, the software will automatically download it to your computer.
Enhanced Podcasts
The podcasts are presented in what’s called the “enhanced” podcast format. This means that they are embedded with still images that change along with the audio, sort of like an old filmstrip or synchronized slide show, but better because they have random access to the entire class. They can be viewed on a computer (using QuickTime or Apple’s iTunes software, both free to download and use) or they can be viewed on any video-capable iPod. The files are .m4a files, so they need QuickTime to view them, or an iPod that can show video.
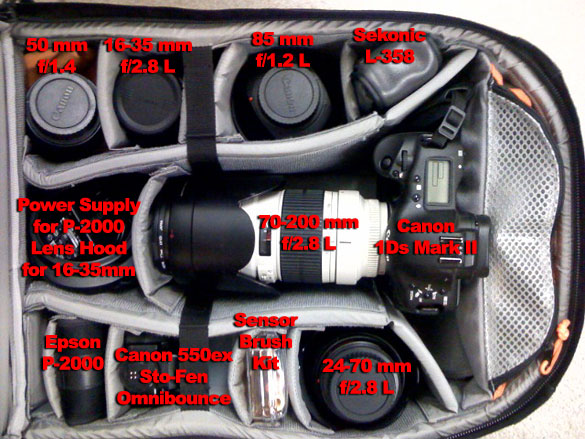
Someone recently asked if I could describe the gear that I normally carry in my camera bag. Here’s a quick look at my normal setup. I have different setups based on what I’m doing, I would never take this much equipment on a travel assignment, but if I’m shooting locally this is what I carry.
All of my lenses are Canon. The sensor brush kit isn’t sold anymore but you can get something similar from Visible Dust. I basically have the old version of the Arctic Butterfly. The Epson P-2000 has also been upgraded with a new gadget from Epson.
The space under the top strap (between the 16–35mm and the 85mm) is usually filled with my MP3 player of the day. I forgot to list that at the time I made this diagram.
The bag is a LowePro CompuTrekker AW. It’s on wheels so that makes carrying so much gear bearable.
Yes, everything is insured. 
I’m going to be publishing a new Digital Photography 1on1 video that is all about bags and packing. I’m going to be out of town a lot in the next month. I’ll be in Portland and New York City and then back home. I’ll try to publish it before I head to NY, but if not I’ll just add some NY footage to the episode!
I’ve been looking for an inexpensive solution for portable power so I could take my studio strobes on locations with no power. I looked into buying a gas generator but decided against it because they are just too big and bulky.
Profoto recently announced the AcuteB 600R which is a very nice pack (currently shipping with free head). This is a pack that I was seriously considering. It’s a relatively inexpensive system that delivers high quality output. The type of location shooting I want to do requires shorter flash durations and a bit more power than the Acute is able to deliver. I also want to the option to use more than one head if needed.
The Pro7b 1200 is really the pack that meets those requirements but it’s beyond our immediate budget. We have several things on our list to purchase this year and at the top of the list is a new Profoto D4 pack. A Pro7b just isn’t in the cards for us anytime soon. But, darn it, I want battery power now!
I’m fortunate to have a great relationship with StudioLighting.net and a couple of months ago Bill Crawford reminded me of the LightSource Podcast featuring David Bean. David talked about a very cool battery pack called the Tronix Explorer. It’s a portable battery pack that’s capable of powering a 1200ws generator for a few hundred flashes. After reading David’s review of the Tronix Explorer I decided to give it a shot.
The Tronix Explorer, a nifty case and shipping was just over $300. It was less than a week from time of purchase till it showed up on my doorstep. That’s pretty incredible from a company that’s located in the Philippines. I’ve had to wait longer for shipments from B&H Photo.
Power Tip: If you’re in the Western US always go to Canoga Camera before B&H. They have stellar prices and service and the shipping costs and times are always better than B&H. Customers outside of California don’t even pay sales tax! That’s big time savings if you’re picking up a new 1Ds Mark III or Profoto D4.
The Tronix Explorer showed up a couple of days ago and I’ve only had a few minutes to play with it. You’ll have to wait for the full blown review (which will probably be a new YouTube video). I did play with it enough to realize it’s heavy. It’s about 20 pounds, not something I want to be lugging around. My first order of business was to put it on wheels.
I recently watched a very cool video that Chase Jarvis put together (click here to download the video). He has a very cool setup for his Pro7B system (yes, I’m jealous). His entire Pro7B system is contained in a single LowePro bag – on wheels – Bingo! Good idea Jarvis. This is why I constantly ask myself, “What would Jarvis do?”. The dude has good ideas.
I happened to have a Pelican 1610 that we weren’t putting to good use. After moving some things around I created a one head setup on wheels. I believe there’s still enough room in the case for my ring flash so I’ll probably throw that in for good measure next time.
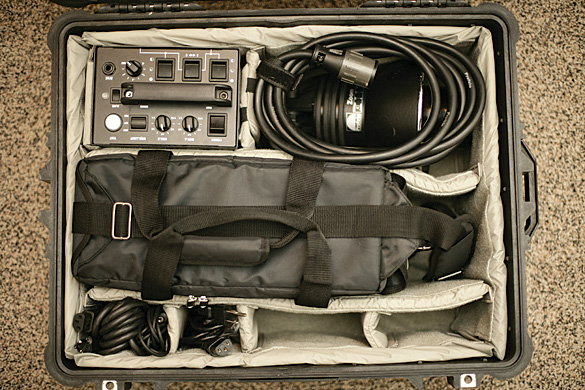
The 1610 hold an Acute2 1200R, D4 head, Tronix Explorer, power cables, sync cable, and a cigarette lighter adapter for charging on the go. You can see I still have empty space for a ring flash, speed ring and other things as needed. The case is a bit too small to fit an umbrella or small softbox but I can always throw those in a different bag pretty easily.
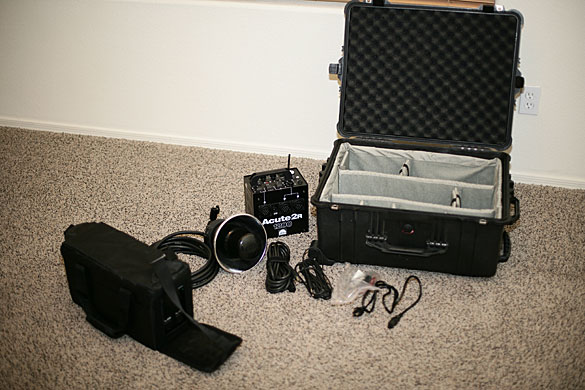
Here are the contents out of the box. The Tronix bag has some nifty flaps that fold down for easy access to the power outlets.
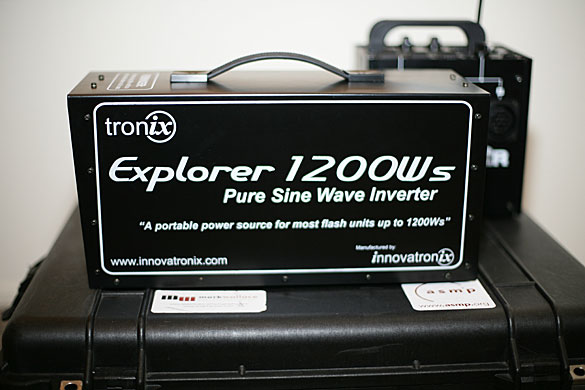
Here’s a shot of the Tronix Explorer without it’s protective case. The Profoto Acute 2 1200r is in the background. The Tronix case is so well designed that I don’t see a need to ever take it out of it’s bag. I just did this to show you what the unit looks like without it.
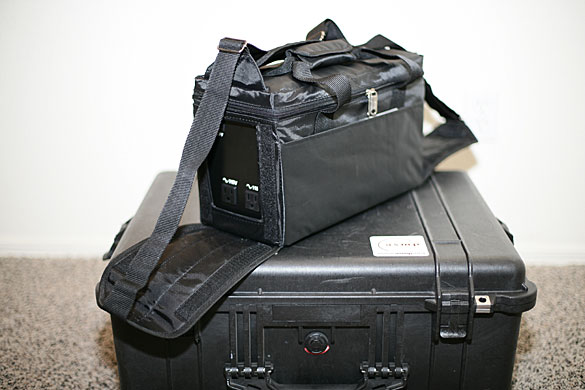
Here’s a shot of the Tronix with it’s clothes on. The bag has reinforced edges and is very rugged. One of the complaints about the Tronix was the wimpy handle that’s built on the top. I guess they created this bag to fix that and give it an added bit of protection on the road.
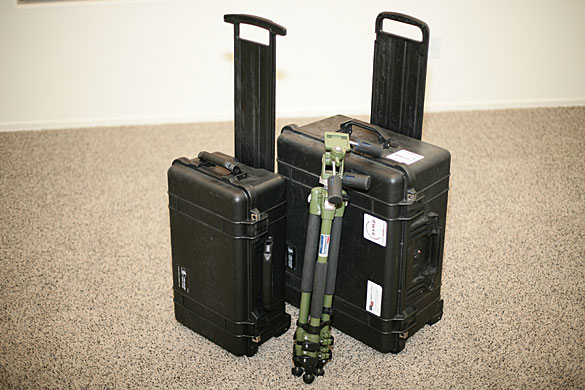
Here’s a shot of the 1610 (on the right) next to our video case (1510). The entire system is very compact and will easily fit in the back of an Xterra. The Pelican cases are also ready to fly if you need to take it out of town.
The only other part of the system that you don’t see is a single Matthews C-stand and sandbag. If you have an assistant you can get by without a light stand but I like to have one along if possible.
I’ll be taking this out for a test shoot as soon as possible. I’ll make sure to tape the experience and post it on YouTube.
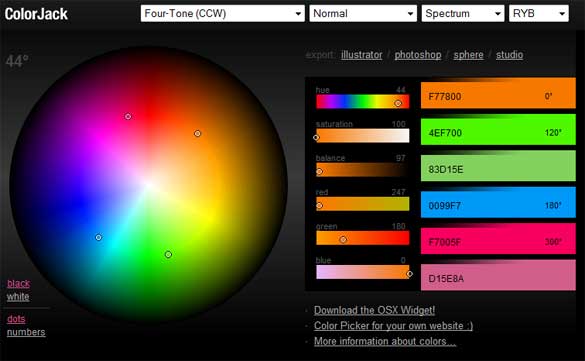
How odd. Just a few minutes after I blogged about the release of the new Lynda.com color management training I was sent a link to ColorJack. ColorJack is a site all about color. If you’re new to Color Theory or just want to learn more you should definitely check it out. They have articles, a cool blog, and some nifty software all waiting for you. My favorite is Sphere.
“Our most popular application, in essence, the sphere allows you to visualize color theory  Sphere supports eighteen formulas and nine color blindness simulations designed to help you choose the right color scheme for your project!”

One of my favorite sessions of my Digital Photography 101 course is the session on color. We talk about additive and subtractive color, the cultural meaning of color, how color has impacted photo-journalism and about color management. Although we do discuss color spaces and using a workflow to get consistent and accurate color there is always so much more to discuss.
I was excited to see that Lynda.com (on of my favorite sites) has just announced a new course on color management. If you’re looking for some great training on this subject then this is a great place to get started.
Color Management Essential Training is an in-depth exploration of applying color theory and color management workflows in various graphics applications. Part 1 (chapters 1-9) explores color and color management theories, while part 2 (chapters 10-20) teaches actual color management techniques that can be incorporated into workflows. Beginning with definitions for such terms as hue, saturation, and metamerism, instructor Chris Murphy teaches the processes for getting consistent color in every stage–from input and edit through final output–and delves into color management principles for the web, prepress, and print. He also details specific color management workflows in Adobe Illustrator CS3, Photoshop CS3, InDesign CS3, Acrobat, and QuarkXPress 7. Exercise files accompany the tutorials.
Topics include:
I recently published a short tutorial for setting up a Pocket Wizard system. One of the things I didn’t talk about too much is some of the things you can do with the Pocket Wizard controlling the camera. Here’s a great video of Chase Jarvis shooting some point of view shots using a very neat rig.
Reuters just released it guidelines for using Photoshop. Some very interesting
rules are set down for their photographers.
ALLOWED:
NOT ALLOWED:
Click here to see all the guidelines and an explanation of the rules.